

A kitchen backsplash doesn’t have to expensive or require professional installation. Whether you’re refreshing a tired wall behind the stove or creating a design focal point, installing a DIY kitchen backsplash is one of the most rewarding projects a homeowner can tackle. The good news? You don’t need advanced carpentry skills, just the right materials, tools, and a clear plan. This guide walks you through choosing affordable materials, prepping your space, and installing your backsplash step-by-step. By the end, you’ll understand why kitchen backsplashes matter, what cheap kitchen backsplash ideas actually work, and how to avoid the most common beginner mistakes.
Table of Contents
ToggleKey Takeaways
- A DIY kitchen backsplash protects your walls from moisture and grease while transforming your kitchen’s appearance, making it both a practical and aesthetic upgrade that can be completed in a weekend without professional help.
- Affordable backsplash material options like ceramic subway tiles ($1–$3 per square foot), peel-and-stick tiles, and painted designs make budget-friendly kitchen backsplash ideas accessible to any homeowner with basic tools and preparation.
- Proper wall preparation—cleaning, priming, and marking a reference line—prevents 90% of backsplash failures, so spend time assessing the substrate, removing old tiles, and ensuring the surface is flat and stable before installation begins.
- Use a wet saw for clean cuts, apply mortar at a 45-degree angle with a notched trowel, and use spacers to maintain uniform grout lines; checking level and plumb frequently ensures a professional-looking, polished result.
- Grouting and caulking are critical finishing steps that seal out moisture and prevent cracking; allow 24 hours for mortar to dry and 72 hours for grout to cure before sealing with a grout sealer for long-term durability.
- Regular weekly cleaning with warm soapy water and annual grout inspections keep your backsplash looking fresh and protected for 20+ years without major repairs or replacement.
Why A Kitchen Backsplash Matters
A kitchen backsplash serves dual purposes: it protects your wall from moisture, grease, and food splatter, and it gives your kitchen visual character. Without one, repeated cooking and cleaning can damage drywall, leaving stains and water damage that eventually require repairs far more expensive than the backsplash itself.
Beyond function, the right backsplash ties your kitchen’s design together. It can echo your cabinet color, complement countertops, or introduce an accent shade that makes the space feel intentional. Many homeowners put off this project thinking it’s too complicated or costly, but affordable options like ceramic subway tiles, peel-and-stick tiles, and even paint-on designs have made backsplash installation accessible to anyone with a weekend and basic tools.
The psychological lift matters too, a fresh backsplash can make a dated kitchen feel modern without gutting cabinetry or replacing counters. That transformation is partly why backsplash projects rank high on DIY satisfaction surveys.
Materials And Tools You’ll Need
Before you commit to a design, gather your materials and tools. Running to the hardware store mid-project kills momentum and accuracy.
Essential Tools:
• Tape measure (25 feet minimum)
• Notched trowel (typically ⅛-inch or ¼-inch notch, depending on tile size)
• Grout float (for spreading and finishing grout)
• Tile cutter or wet saw (a wet saw gives cleaner cuts on ceramic and stone)
• Sponges and buckets for cleanup
• Safety gear: goggles, gloves, dust mask (silica dust from cutting tiles poses respiratory risk)
• Spacers (if using traditional tiles) to maintain even grout lines
• Sealant gun (for caulking corners and edges)
Base Materials:
• Thin-set mortar or mastic adhesive (read the package, some work better on certain tile types and substrates)
• Grout (epoxy, urethane, or unsanded varieties: choice depends on joint width and durability needs)
• Caulk or silicone sealant at corners and edges
• Primer and paint (if your substrate requires it)
Popular Backsplash Material Options
Ceramic Subway Tiles are the workhorse of cheap kitchen backsplash ideas. A 3×6 or 4×8 inch subway tile runs $1–$3 per square foot. Installation is straightforward: lay them in a running bond (offset) pattern, and they look timeless. Grout adds minimal cost and seals out moisture. Clean-up is easy with a damp sponge.
Peel-and-Stick Tiles offer the fastest install, no mortar, no grout, no wet saw required. Stick them directly to clean, dry drywall, and you’re done. Quality varies widely, so read reviews carefully. These work best in low-splash zones (away from the stove) and don’t handle heat as well as ceramic.
Painted Backsplash or Stenciled Designs cost almost nothing if you already have paint. A high-gloss or semi-gloss finish in a wipeable kitchen paint resists splatter. Stencils let you add pattern without tiling, though durability is lower than tile.
Shiplap or Beadboard Backsplash gives farmhouse charm. Wood backsplash materials are budget-friendly and easy to install with a nail gun or screws. Seal with water-resistant stain or paint to protect against moisture. This works best in kitchens with less active cooking.
Glass Tiles or Mosaics cost more upfront but last indefinitely and feel premium. If budget allows, they’re worth the investment for durability and light reflection.
Preparing Your Kitchen For Installation
Ninety percent of backsplash failures stem from poor prep. Your substrate, drywall, tile, or existing backsplash, must be clean, flat, and stable.
Step 1: Assess Your Wall.
Press on the wall with your palm. If it flexes, the drywall is weak or damaged, and tiles may crack over time. Check for moisture stains or soft spots indicating water damage. If present, address the leak first: tiling over a problem won’t solve it.
Step 2: Remove or Repair Old Backsplash.
If replacing an existing backsplash, remove old tiles carefully using a cold chisel and hammer. Wear goggles and a dust mask, old grout can contain silica. Once removed, inspect the substrate for damage and flatten any bumps with a drywall patch or self-leveling underlayment.
Step 3: Clean and Prime.
Wash the wall with a TSP (trisodium phosphate) solution or degreaser to remove grease buildup. Rinse thoroughly and let dry completely, this typically takes 24 hours. If tiling over bare drywall, apply a primer-sealer designed for tile (brands like Hydro-Ban or RedGard are standard). This prevents the drywall from absorbing moisture from mortar, which weakens the bond.
Step 4: Measure and Mark.
Use a level and chalk line to mark a horizontal reference line. Start this line 1–2 inches above your countertop, leaving room for expansion and caulking. Snap the chalk line so it’s visible. This guides your first row and ensures everything stays plumb and level.
Step-By-Step Installation Process
Installation is where planning pays off. A focused, methodical approach beats rushing.
Spreading Mortar:
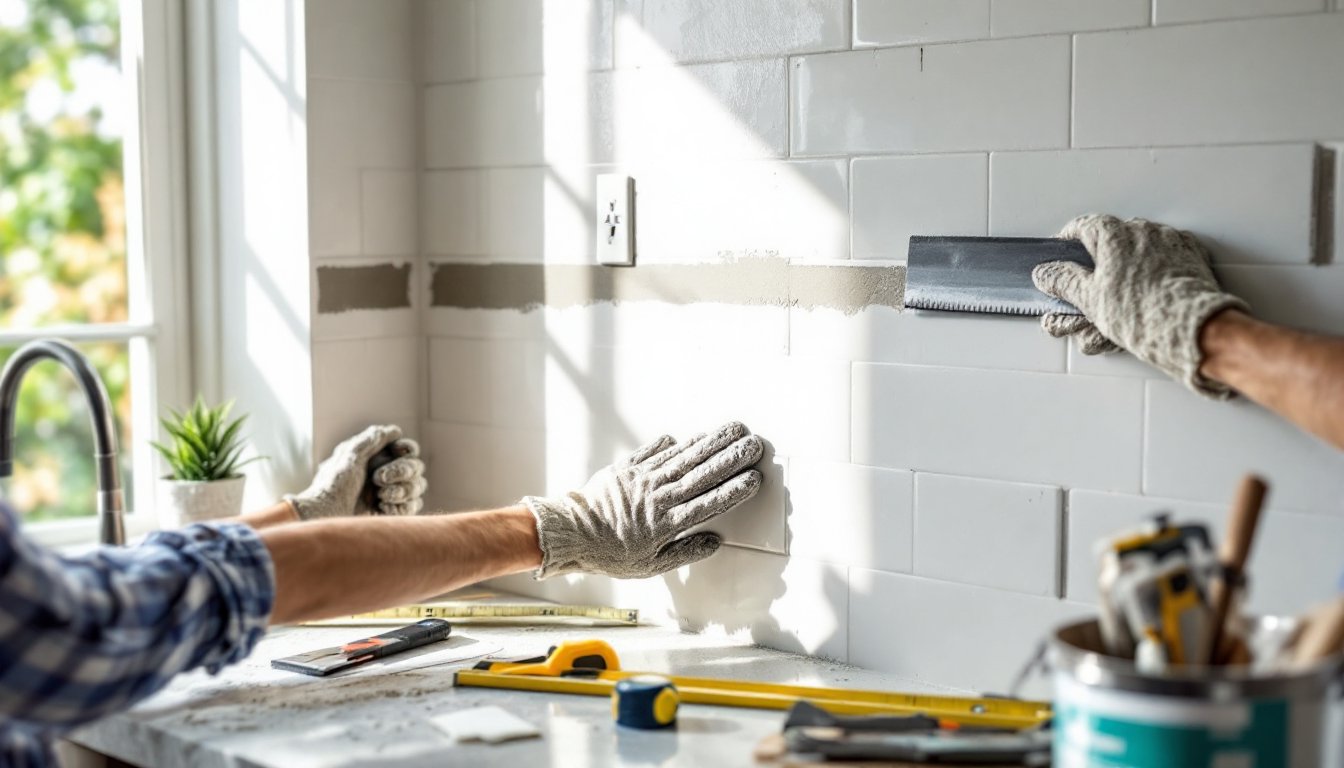
Mix your thin-set to a peanut butter consistency, thick enough to hold ridges but spreadable. Use a notched trowel at a 45-degree angle, combing horizontal ridges across the wall. Ridges ensure full contact between tile and substrate. Work in small sections (2–3 square feet) so mortar doesn’t dry before you press tiles.
Pressing Tiles:
Press each tile firmly with a slight twisting motion to embed it in mortar. Ridges should collapse, leaving no voids. Use spacers between tiles to keep grout lines uniform (typically ⅛ inch for most DIY projects). Step back every few minutes to verify level and plumb. A tile that’s off by ⅛ inch now will throw everything downstream.
Checking As You Go:
Use a level on both horizontal and vertical axes. Most DIYers focus on horizontal level but forget vertical plumb, both matter for a polished look.
Measuring, Cutting, And Positioning Tiles
Measuring Accurately:
Measure twice from your reference line upward and horizontally from a corner. Account for grout-line width in your calculations. If your backsplash spans 36 inches and you’re using 6-inch tiles with ⅛-inch grout lines, you’ll need exactly 5.5 tiles horizontally, meaning your corner tiles will need cutting.
Cutting Tiles:
A wet saw is the gold standard for ceramic and stone tiles. It produces clean, straight cuts and handles angled cuts smoothly. If you don’t own one, many hardware stores rent them for $20–$30 per day. For peel-and-stick tiles, a utility knife works fine.
When cutting ceramic or glass, wear a dust mask and goggles. The saw’s water reservoir keeps dust down but doesn’t eliminate it. Mark your cut line with a pencil and let the saw do the work, don’t force the tile. Pushing too hard chips the edge and wastes material.
Positioning Edge Tiles:
Corner and edge tiles should be symmetrical. If your layout leaves a sliver (less than 1 inch) on one side, distribute the width between both sides so they’re equally narrow. This looks intentional rather than miscalculated.
Finishing Touches And Maintenance
Once mortar dries (24 hours typically), grouting comes next. This step seals out moisture and completes the look.
Grouting:
Mix grout to a thick, creamy consistency. Use a grout float at a 45-degree angle to push grout diagonally across tiles, filling joints completely. Wipe excess grout with a damp sponge before it hardens. This is where elbow grease matters, sloppy grouting looks unfinished. After grout firms up (follow package time), make a final pass with a barely damp sponge to smooth lines and remove haze.
Caulking Corners and Edges:
Where your backsplash meets cabinet edges or countertops, use silicone caulk rather than grout. Grout cracks at corners due to movement: caulk flexes. Apply a smooth bead with a caulking gun and smooth it with a wet finger for a professional finish.
Sealing (Optional but Recommended):
Once grout cures fully (72 hours), apply a grout sealer if you chose a porous grout type. This prevents staining from cooking oils and acidic foods. Epoxy or urethane grouts are inherently stain-resistant and don’t require sealing.
Long-Term Maintenance:
Clean your backsplash weekly with warm soapy water and a soft cloth. Avoid harsh abrasives that scratch tile or grout. For stubborn grease, a degreaser works, but rinse thoroughly. Inspect grout lines annually: if you spot cracks, reseal or repoint with fresh grout to prevent water penetration. With proper maintenance, a tile backsplash lasts 20+ years without issues.
For additional inspiration on easy backsplash for kitchen projects, 10 DIY kitchen backsplash ideas showcase creative affordable options. If you’re tackling ceramic specifically, detailed installation guidance from experienced builders covers advanced techniques. For broader kitchen design context, resources on kitchen design offer complementary ideas on integrating backsplash with cabinetry and countertops.