

Gray tile has become the go-to choice for shower renovations, and for good reason. It’s versatile enough to work with almost any bathroom style, whether you’re going modern minimalist, spa-like, or transitional, while remaining practical and timeless. Unlike trendy colors that fall out of favor quickly, gray tile shower ideas offer longevity and flexibility. Light grey shower tile ideas work especially well in smaller bathrooms, creating an airy feel without overwhelming the space. Whether you’re planning a full shower overhaul or just refreshing the surround, these 12 design approaches will help you choose the right gray tile option for your space and skill level.
Table of Contents
ToggleWhy Gray Tile Is the Perfect Shower Choice
Gray tile works because it bridges the gap between bold and neutral. It complements chrome, matte black, brass, and brushed nickel fixtures equally well. Unlike white tile, which shows every water spot and soap residue, gray conceals minor imperfections and actually looks cleaner longer, a practical win for bathrooms with hard water.
From a design standpoint, gray creates a calm, spa-like atmosphere that doesn’t feel cold or sterile. It’s also the best background for accent pieces: a patterned floor, a contrasting grout color, or natural stone accents will pop against gray walls without competing for attention. Homeowners appreciate that gray tile holds its value in resale, since it appeals to a wide range of buyers rather than polarizing them with bold color choices.
The other advantage? Gray comes in dozens of finishes and formats. You can find light, medium, or charcoal tones in subway, hexagon, large-format slab, handmade, glazed, and textured profiles. This flexibility means there’s a gray tile solution for nearly any budget, skill level, and aesthetic preference.
Classic Subway Tile Patterns
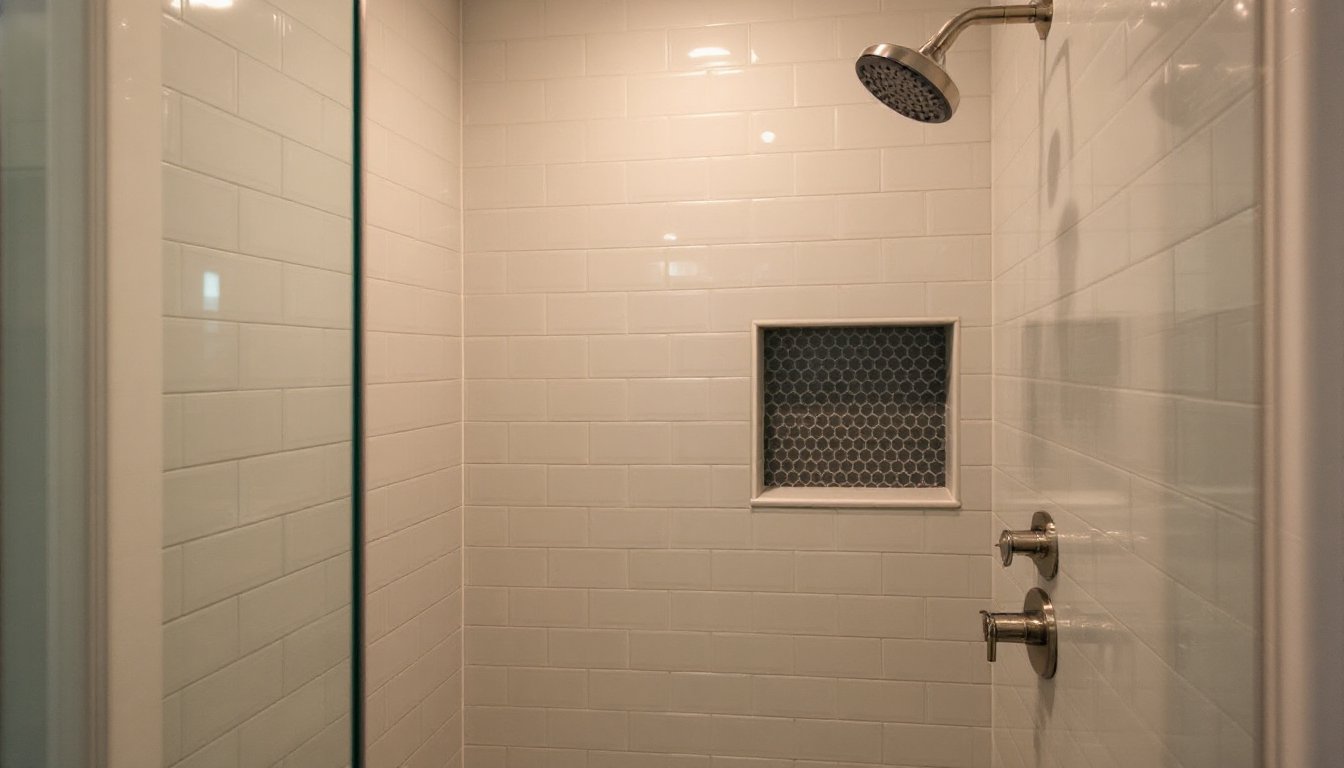
Subway tile, typically 3″ × 6″ or 3″ × 8″, remains the easiest entry point for DIY tile work. Its uniform rectangular shape and widely available grout joints make layout straightforward, even for first-timers. Light gray subway tiles create a clean, horizontal flow that visually expands small showers, while medium gray adds more visual interest without darkness.
The running bond (staggered brick) pattern is the standard approach and hides installation imperfections better than straight-aligned layouts. Pro tip: start your first row at the shower base and work upward, not down from the ceiling. This ensures full tiles at the top where they’re most visible: any cuts happen at the bottom or inside corner.
Gray subway tile’s neutral tone lets you play with grout color for personality. Light gray tile with medium gray grout creates subtle depth: darker grout lines make the grid pattern more pronounced and graphic. Expect to use roughly 1.4 square feet of tile per square foot of wall area to account for cuts and waste. Plan for 5–10% extra material, and always verify your tile dimensions before ordering, nominal sizes vary by manufacturer.
Larger Format and Minimalist Designs
12″ × 24″ (or larger) format tiles and large-scale slab options dominate contemporary bathroom design. Fewer grout lines mean a cleaner, more sophisticated look and easier cleaning, fewer joints trap mildew and soap buildup. Light grey shower tile ideas in larger formats work especially well in spacious bathrooms, where they feel proportional and uncluttered.
Larger tiles require more planning and precision. You’ll need a sturdy, level substrate, any dips or waves in the wall will show immediately with big format tile. A cement board or waterproofing membrane rated for wet areas is essential: thin-set mortar must be applied to both the wall and tile back (full coverage, not just perimeter dabs). A notched trowel, typically 1/2″ or 3/8″ square-notch for this size, ensures consistent bed depth.
The trade-off: installation is more forgiving for beginners with subway tile than with large format, since larger tiles have less margin for error in leveling and alignment. If you’re not confident with layout or backboard preparation, consider hiring a tile professional for large-format work. A poorly installed 24″ tile will be far more noticeable, and more expensive to replace, than a standard subway subway piece. Gray in large format reads as extremely modern and is popular on interior design platforms like Homify, where minimalist bathroom aesthetics dominate current trends.
Textured and Three-Dimensional Tiles
Textured tiles add depth and visual interest without requiring a second color or pattern. Rustic finishes, hammered surfaces, or subtle raised-and-recessed designs create shadow play under lighting, making a gray shower feel less flat and more sophisticated.
Common textured options include:
• Rustic or matte-glazed tiles – less slippery than glossy finishes: easier to grip in a wet environment
• Handmade or artisanal tiles – slight irregularities in size and surface create character and hide grout inconsistencies
• 3D or geometric relief tiles – create bold geometric patterns: work best as focal point walls rather than full enclosures
• Textured large-format slabs – stone-look or concrete-look finishes in gray feel industrial and modern
One consideration: textured tiles are harder to clean. Grooves collect soap residue and hard-water deposits more easily than smooth glazed surfaces. Choose a grout sealer rated for wet areas and plan on deeper cleaning every 6–8 weeks. Also verify slip resistance, textured tiles aren’t necessarily slip-safe. Look for ASTM F1679 ratings if safety is a concern, especially in a shared bathroom.
Accent Walls and Mixed Pattern Ideas
Using gray tile as a base and introducing patterned or contrasting accent tiles creates focal points without overwhelming the space. A classic approach: light gray subway tile on three walls, then a patterned or darker tile on the wall opposite the shower door. This draws the eye and breaks up visual monotony in tight bathrooms.
Mixed patterns work when they share a color palette and similar scale. For example, light gray 3″ × 6″ subway tile paired with a geometric patterned tile in gray, white, and charcoal creates visual rhythm without clashing. Alternatively, use textured gray tile on the surround and reserve patterned tile (or a marble accent strip) for a niche, corner, or single feature row.
When mixing materials, start your accent wall layout in the center and work outward symmetrically to avoid awkward partial tiles at edges. Always dry-lay (arrange without mortar) your pattern first, especially when mixing multiple tile sizes or shapes. This prevents expensive mistakes and helps you visualize negative space and grout joint alignment. Design inspiration for mixed patterns is abundant on HGTV, where bathroom renovation shows regularly showcase creative tiling strategies.
Installation and Maintenance Tips
Preparation is everything. Remove existing tile completely if present, don’t tile over tile. Install 1/2″ cement board (not drywall) as your substrate: it resists moisture and won’t crumble behind grout. Use galvanized or stainless fasteners and space them every 6–8 inches. Apply a waterproofing membrane over seams and in corners before tiling: this keeps moisture out of wall cavities, a common cause of mold and structural damage.
Mixing and application: Use a modified thin-set mortar (not regular grout) on walls, it bonds better to vertical surfaces. Mix only what you’ll use in 30 minutes: dried thin-set can’t be rewetted. Spread with a notched trowel held at 45 degrees, then comb back through for consistent ridges. Butter the back of each tile slightly for full coverage, especially important for large-format tile.
Grout and sealing: Wait 24 hours before grouting. Use epoxy or urethane grout in wet areas, traditional cement grout will absorb water and eventually fail. After grouting, seal the grout lines within 48 hours using a penetrating sealer rated for shower environments. This prevents mildew and water absorption that weakens grout over time.
Maintenance: Squeegee after each shower and ventilate well (exhaust fan on for 20 minutes). Clean weekly with a pH-neutral tile cleaner: avoid acidic cleaners that etch grout. Reapply grout sealer annually in high-moisture areas. Gray tile hides spotting better than light colors, but proper ventilation and quick drying still prevent long-term mildew growth. Detailed installation guidance for various tile types is available through resources like Remodelista, which includes manufacturer specifications and contractor-vetted techniques.
Conclusion
Gray shower tile offers flexibility, durability, and timeless appeal that few other colors match. Whether you choose classic light gray subway tile, modern large-format slabs, or textured designs with visual depth, gray adapts to your style and skill level. Start with honest assessment of your abilities and substrate condition, prep work and waterproofing matter far more than tile choice itself. If wall surfaces are uneven or you’re uncomfortable with waterproofing details, bring in a professional for that phase and handle finishing work yourself. The result: a shower that looks intentional, functions well, and won’t feel dated in five years.