

A gaming bedroom isn’t just a place to sleep, it’s a dedicated space where performance, comfort, and personal style collide. Whether you’re a casual mobile gamer or someone running a high-end PC rig with multiple monitors, the right setup can transform your room into a functional command center that you’ll actually want to spend time in. The good news? You don’t need to drop thousands of dollars to build a gaming bedroom that works. With smart planning around desk placement, lighting, ergonomics, and storage, you can create a space that supports both your gaming sessions and everyday living. This guide walks through practical design choices and budget-friendly solutions that’ll help you build a gaming bedroom tailored to your needs and wallet.
Table of Contents
ToggleKey Takeaways
- A properly sized gaming desk (60–72+ inches) with organized cable management serves as the foundation for a functional gaming bedroom setup.
- Task lighting positioned to the side of your monitor at 300–500 lumens with 4000K color temperature reduces eye strain better than overhead lights alone.
- Dark or medium-toned wall colors minimize glare and reflections on your screen, making them ideal for gaming bedroom design choices.
- An ergonomic chair with adjustable lumbar support, proper armrest height, and 16–18 inch seat depth prevents back and neck pain during long gaming sessions.
- Vertical wall-mounted storage and under-desk organizers keep gaming gear, cables, and peripherals accessible without cluttering floor space.
- Building a gaming bedroom prioritizes function over decorative flash—start with desk and chair ergonomics, then add lighting and storage solutions progressively.
Choosing the Right Desk and Gaming Setup
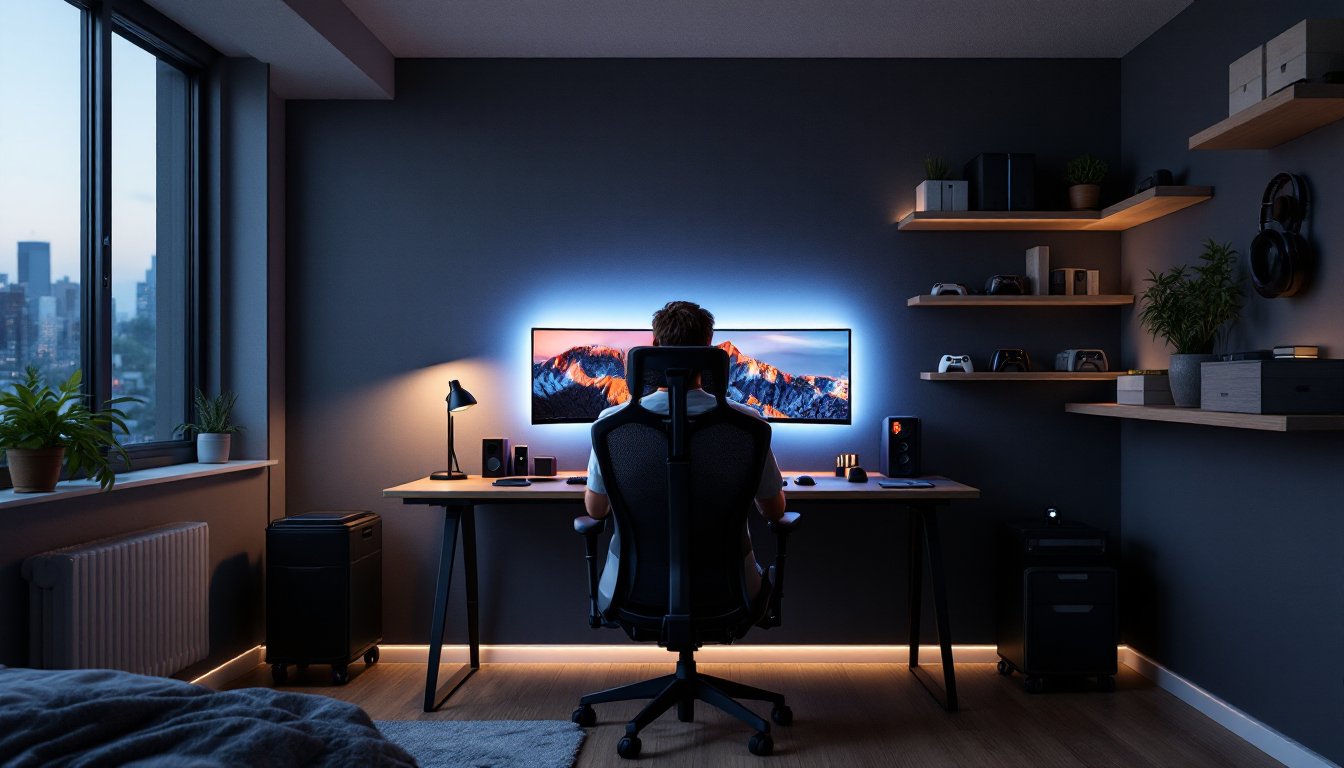
Your desk is ground zero for a gaming bedroom. It needs to accommodate your monitor(s), keyboard, mouse, and ideally some breathing room for your arms to move without hitting the wall. A 60-inch wide desk works well for a single monitor and basic peripherals: jump to 72 inches or wider if you’re running dual monitors or plan to expand later.
Consider your monitor placement carefully. The top of your screen should sit at or slightly below eye level when you’re seated, about 24–30 inches away. This reduces neck strain during long sessions. If you’re working with a tight space, wall-mounted shelving above a narrow desk can free up floor space while keeping your setup compact.
For the desk itself, solid construction matters more than brand prestige. A basic solid wood or quality particleboard desk with a stable frame will outlast wobbly budget options. If you’re handy, building a custom desk from dimensional lumber (commonly called a 2×4 or 2×6 top with steel hairpin legs) costs less and gives you exact dimensions that fit your room. Woodworkers often share free plans: Ana White has beginner-friendly desk tutorials if you want to go the DIY route.
Cable management deserves attention here. Run cables behind the desk using clips or a cable raceway ($10–20 at hardware stores). A small power strip mounted to the desk underside keeps everything organized and off the floor. Route cables cleanly, it’s easier to do during setup than to retrofit later.
Lighting Design for Comfort and Performance
Proper lighting makes the difference between a room that feels like a cave and one that’s comfortable for hours of gaming. You need two types: task lighting for your desk and ambient lighting for the rest of the room.
Task lighting should be bright and positioned to the side of your monitor, not directly behind it (which creates glare on your screen). A desk lamp with 30–40 watts of LED output (roughly 300–500 lumens) is solid. Aim for color temperature around 4000K (neutral white), which reduces eye strain better than warm yellow bulbs. Position it so light falls on your keyboard and desk surface, not your face.
For ambient lighting, don’t rely on your overhead fixture alone. Add a floor or wall-mounted light on the opposite side of your desk to balance shadows. This prevents that harsh “spotlight on the desk, darkness everywhere else” feeling that leads to eye fatigue.
RGB and Ambient Lighting Options
RGB lighting looks cool, but use it as accent, not primary light. LED strip lighting behind your monitor or along shelving adds visual interest without interfering with screen visibility. Look for dimmable RGB strips with a remote or app control ($20–50), they let you adjust color and brightness without getting up.
If you want to dive deeper into ambient options, consider a smart bulb system that lets you shift color temperature throughout the day. Morning/afternoon sessions benefit from cooler light (5000K+), while evening gaming feels better around 3000K. The investment is modest ($15–30 per bulb) and pays off in reduced eye strain and better sleep afterward. Avoid placing bright lights directly in your line of sight to the monitor: side and rear positioning works best for gaming.
Color Schemes and Wall Treatments
Wall color sets the mood and affects how your space feels during long sessions. Dark walls ($15–25 per gallon of paint) absorb light and reduce reflections on your monitor, which is genuinely useful for gaming. Deeper tones like charcoal, dark navy, or muted gray are gaming-friendly without looking like a dungeon.
If dark feels too heavy, a medium gray or soft taupe offers good contrast without the cave effect. Avoid bright whites and pale yellows, they reflect light straight at your screen and cause glare. A quick rule of thumb: if natural light bounces off the wall and hits your monitor, the color is too reflective.
For accent walls, consider a feature wall behind your desk in a slightly darker or complementary tone. This draws focus to your gaming area without overwhelming the room. If you’re renting and can’t paint, removable wallpaper or large fabric panels pinned to the wall work as temporary alternatives.
Skip the trendy neon posters and anime prints as your primary wall strategy. Instead, use shelving or wall-mounted storage to display gaming memorabilia. This keeps the space looking intentional rather than cluttered, and it’s easier to change out later without redecorating the whole room. A few well-placed pieces of bedroom inspiration work better than walls plastered with decals.
Storage and Organization Solutions
Gaming rooms accumulate gear fast: controllers, cables, headsets, external hard drives, and backup power supplies. Without a plan, your floor becomes a storage unit.
Start with a desk hutch or shelf unit above your workspace. A simple 2-shelf or 3-shelf unit ($40–80) holds controllers, headsets, and frequently used items within arm’s reach. If you’re building custom, plywood shelves with 3/4-inch boards supported by 24-inch brackets are rock-solid and cost less than pre-made units.
For overflow, use vertical wall space. Wall-mounted shelving takes up less footprint than freestanding cabinets. Locate shelves at eye level or slightly above so they don’t crowd your sightline. Label shelves or use clear bins so you can find things without digging.
Consider a rolling cart ($30–50) for less-used items or cable storage. It slides under your desk when not needed and pulls out when you’re troubleshooting hardware. For cable management specifically, a cable box or under-desk organizer ($15–25) keeps power strips, adapters, and excess cord from becoming a fire hazard and eyesore.
Game storage depends on your setup. Digital gaming takes no physical space, but if you have physical media, a retro gaming cabinet built from IKEA Kallax shelving is a popular DIY option that combines display and storage. It’s a weekend project and costs under $100 in materials.
Seating and Comfort Considerations
Your chair is arguably the most important investment in a gaming bedroom. Cheap chairs cause back and neck pain within a few hours, which defeats the purpose of having a dedicated gaming space.
Look for a chair with adjustable lumbar support, armrests, and seat height. You don’t need a $500 brand-name gaming chair: a quality office or task chair ($150–300) with these features outperforms flashy racing-style seats that prioritize looks over ergonomics. The key specs: adjustable backrest, depth of 16–18 inches, and a seat that slopes slightly forward to reduce lower back strain.
Test the chair before buying if possible. Sit for at least 10 minutes to check armrest height, lumbar curve, and how the seat feels. Your feet should rest flat on the floor (or on a footrest) when the chair is at proper height.
Armrest height matters more than people think. They should support your arms at roughly 90 degrees when your hands are on the keyboard, not force your shoulders up or down. Adjustable armrests ($20 extra) are worth it.
If you’re on a tight budget and can’t upgrade your chair immediately, a lumbar pillow ($20–40) makes a world of difference on a mediocre seat. It’s a temporary fix, not a permanent solution, but it buys you time to save for a proper chair. Pair it with a desk footrest to reduce leg strain during long sessions. The combination of good seating posture, proper desk height, and monitor placement prevents fatigue better than any gaming accessory ever will. Your future back will thank you for taking this seriously now.
Conclusion
Building a gaming bedroom comes down to prioritizing function over flash. Start with desk placement and ergonomics, nail your lighting setup, choose colors that reduce eye strain, and invest in storage and seating that actually work. You’ll spend more time in this room feeling comfortable and performing better than scrolling through decoration ideas. Pick one area to tackle first, your desk and chair combo is usually the best starting point, then build from there. A well-designed gaming bedroom evolves: it doesn’t need to be perfect on day one.