
A wall pantry cabinet transforms the way you store and access everyday staples. Whether you’re squeezing storage into a galley kitchen or maximizing a blank wall, smart wall pantry ideas let homeowners make the most of vertical space without sacrificing style or function. From open shelving that displays your best cookware to deep built-in units that hide clutter, wall pantry solutions fit kitchens of every size. The key is matching the design to your space, lifestyle, and DIY skill level. In 2026, homeowners are choosing pantry styles that blend practicality with modern aesthetics, no more bulky, generic cabinets that stick out like a sore thumb.
Table of Contents
ToggleKey Takeaways
- Wall pantry cabinet ideas maximize vertical storage in kitchens of any size while blending practicality with modern aesthetics, from open shelving to custom built-ins.
- Open shelving works best with sturdy 50-pound-rated brackets, neutral wall backdrops, and grouped items displayed by height and color for a clean, intentional look.
- Tall narrow wall pantry cabinets (24-30 inches wide, 84+ inches tall) fit snugly in compact spaces and benefit from pull-out drawers and soft-close hinges for easy access.
- Corner wall pantry installations eliminate wasted space with L-shaped layouts or rotating lazy Susan shelf units, enhanced by LED lighting to improve visibility.
- Transform your pantry cabinet into a functional storage system by using matching clear containers, categorizing items by type, and performing monthly maintenance to prevent clutter and expired goods.
- DIY wall pantry projects are achievable with basic tools and materials, anchored securely to studs, while professional-quality results come from pocket hole joinery and proper sanding and finishing techniques.
Open Shelving Pantry Designs for Modern Kitchens
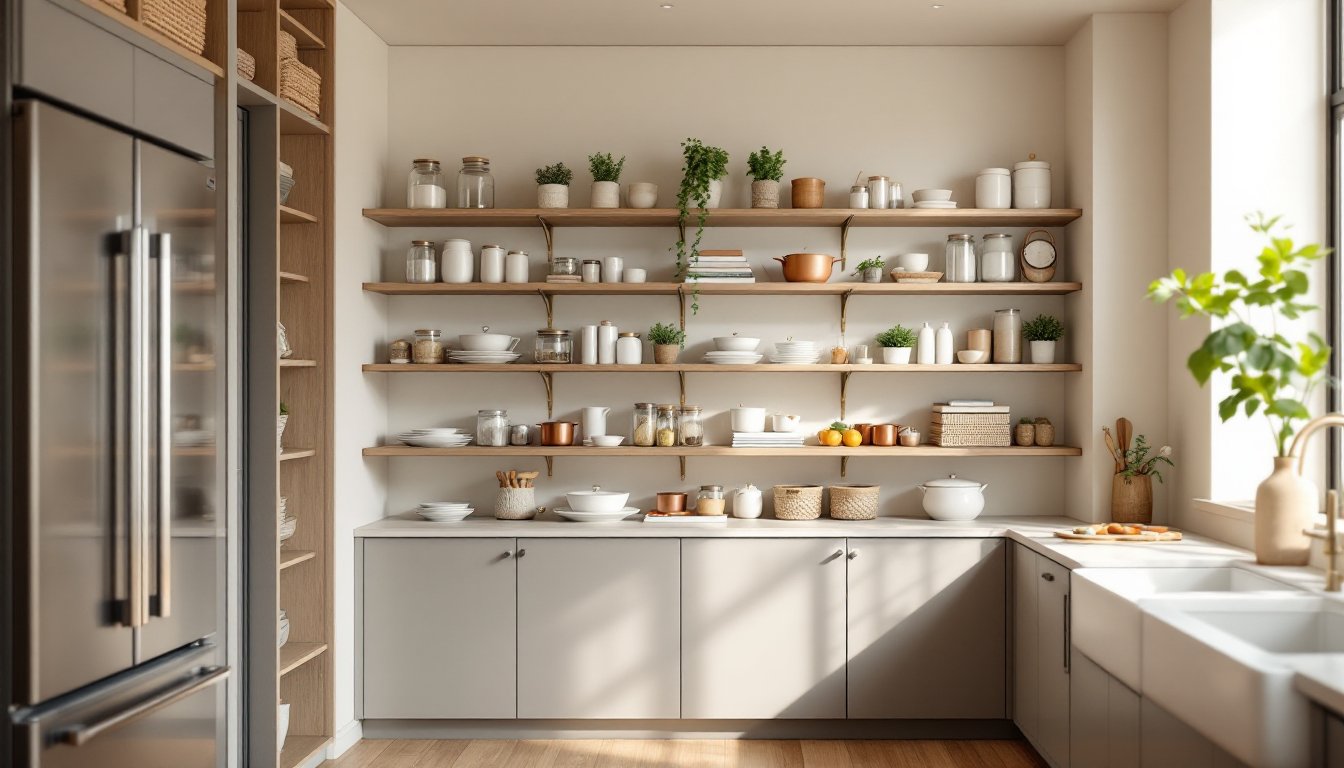
Open shelving is the go-to choice for kitchens that need visual lightness and easy access. Unlike closed cabinets, open shelves let you see what you have at a glance, which cuts down on overbuying and forgotten ingredients tucked in the back. The trade-off? Everything on display needs to be organized and attractive.
When building open shelves, aim for sturdy, well-anchored brackets rated for at least 50 pounds per shelf. Standard depths range from 10 to 14 inches, deep enough for most items but not so deep you can’t reach the back. Use floating shelves (brackets completely hidden behind the wall) for a clean look, or go with visible brackets in metal or wood to add character.
Paint the wall behind the shelves in a soft, neutral tone like soft white, warm beige, or pale gray. This backdrop makes stacked dishes, glass jars, and cookbooks look intentional rather than haphazard. Keep items grouped by height and color, and leave some breathing room, a shelf jammed full of stuff looks chaotic, no matter how organized it actually is. Many homeowners are pairing open shelves with woven baskets or matching storage boxes to corral smaller items while maintaining the modern aesthetic that kitchen design ideas consistently showcase.
Tall Narrow Wall Pantry Cabinets for Compact Spaces
Compact kitchens demand creative solutions, and tall narrow wall pantry cabinets deliver serious storage in a footprint barely wider than a standard door. A typical tall pantry cabinet runs 24 to 30 inches wide, 12 to 16 inches deep, and reaches 84 inches or higher, making it perfect for corners, the wall beside the fridge, or tight alcoves.
These cabinets work best when installed between studs or anchored directly to studs with a ledger board at the base to distribute weight. Most homeowners purchase pre-made units to save time, but you can also build a custom frame from 2-by-4 lumber, add plywood sides, and hang slab doors (flat, frameless doors that give a modern look). Interior shelving should be adjustable, use shelf pins or dados (grooves routed into the sides) to allow flexibility as your storage needs change.
For narrow wall pantry cabinets in tight spaces, pull-out drawers or sliding shelves are game-changers. They let you access items in the back without reaching awkwardly or removing everything in front. Soft-close hinges and drawer glides cost more upfront but prevent slams and broken dishes. Paint the interior white or a light tone to reflect light and make the cabinet feel larger inside.
Built-In Pantry Cabinet Organization Systems
A true built-in wall pantry is custom-fitted to your kitchen’s dimensions and styled to match your cabinetry. Built-in pantry cabinet organization systems take advantage of every inch, combining open shelves, closed storage, and specialized compartments in one unified design.
Start with a sturdy frame anchored to studs. Use 2-by-4 lumber for the vertical studs (typically 16 inches on center) and a 2-by-8 or 2-by-10 ledger at the base if the cabinet will sit on the floor. The face frame, the visible wood frame around the cabinet opening, is usually made from 1-by-2 or 1-by-3 lumber, mortised and tenoned or doweled for strength.
Interior layouts should combine zones. Reserve top shelves for seldom-used items (specialty baking supplies, serving pieces). Middle shelves hold everyday staples like canned goods, pasta, and oils. Lower shelves and pull-outs accommodate bulkier items, small appliances, or bulk pantry stock. Add adjustable shelf supports (shelf pins fitting into drilled holes) rather than fixed shelves, your needs will change, and flexibility prevents costly mistakes later. Finish the interior with paint or veneer that matches or complements your cabinet doors. Built-in pantry ideas that incorporate vertical dividers for baking sheets, pull-out baskets for snacks, and spice racks make the space genuinely functional rather than just decorative.
Corner Wall Pantry Installations and Layout Options
Corner spaces often go wasted in kitchens, but a corner wall pantry installation maximizes dead space and creates a hidden storage hub. Lazy Susan shelves, swing-out baskets, and angled shelving all tackle the awkwardness of reaching into a corner.
One proven layout is the L-shape: two walls meeting at a right angle, with shelving or cabinets running up both sides. This doubles your storage footprint and keeps items visible on either wall. Install shelves at staggered heights to accommodate different items, shorter shelves for spices and small jars, taller gaps for mixing bowls or stacked small appliances.
Alternatively, a single-wall corner cabinet with a 45-degree rotating shelf unit (a lazy Susan style insert) lets you access items that would normally be hidden in the back corner. These rotating units typically come as aftermarket inserts you can retrofit into an existing cabinet or install while building a new one. They cost between $100 and $300 depending on quality, but they recover storage space that would otherwise be wasted.
For corner pantries, lighting is crucial. A battery-operated LED strip or a wired under-shelf light mounted above the first shelf illuminates the entire corner, making it easy to spot items and preventing the “dungeon” feeling some corner cabinets get. Measure your corner carefully before ordering cabinets or materials, kitchen corners are rarely perfect right angles, so custom-built units often fit better than stock ones.
DIY Wall Pantry Cabinet Projects You Can Build
If you’re comfortable with a circular saw, drill, and level, building a basic wall pantry cabinet is achievable in a weekend. Here’s a straightforward approach:
What You’ll Need:
• 2-by-4 and 1-by-2 lumber (pressure-treated for the base, standard pine or oak for the frame)
• ¾-inch plywood for the back and shelves
• 1¼-inch wood screws for frame joinery
• 2½-inch screws for anchoring to studs
• Wood filler, sandpaper (120-grit and 180-grit), primer, and paint
• Shelf pins or adjustable shelf brackets
• Hinges, door pulls, and magnetic catches (if adding doors)
• Wood stain or polyurethane finish (optional)
Basic Steps:
- Locate studs in the wall using a stud finder and mark them with a pencil.
- Build a face frame from 1-by-2 lumber, cutting pieces to fit your wall opening and joinery them with pocket holes or dowels.
- Screw the frame directly to studs using 2½-inch wood screws, at least two screws per stud.
- Add a plywood back to the frame, screwing it every 12 inches for support.
- Install adjustable shelf pins into pre-drilled holes (use a pegboard template to keep spacing consistent) and drop in shelves cut from ¾-inch plywood.
- Sand all visible surfaces with 120-grit, then 180-grit sandpaper to smooth edges and prepare for finishing.
- Prime and paint, or stain and seal depending on your kitchen style.
Wear safety glasses, work gloves, and a dust mask when cutting and sanding. Use hearing protection if running power tools for extended periods. Pocket holes (made with a Kreg jig, around $50–$100) speed up joinery and hide fasteners, making the final product look more professional.
For a more advanced project, add cabinet doors or a sliding barn-style door front. Pre-made slab doors from home centers (usually $30–$100 each in standard sizes) save time versus building from scratch. Consult interior design ideas and home decor inspiration for styling cues once your cabinet structure is complete.
Styling and Maintaining Your Wall Pantry Storage
A well-organized pantry is only half the battle, how you style and maintain it determines whether it stays functional or degrades into chaos.
Start with clear, matching containers. Invest in glass jars, airtight bins, or labeled plastic canisters (typically $5–$20 per piece) for flour, sugar, cereals, and pasta. Transfer items from original packaging, label with a label maker or a paint pen, and include expiration dates. This approach saves shelf space, prevents pests, and makes it obvious when supplies run low.
Group items by category: baking supplies together, canned goods together, snacks in one area. Use small baskets or boxes to corral like items, spices in a small pull-out drawer, tea bags in a basket, condiments in another. Vertical risers (simple wire or wood shelves that sit on a larger shelf, creating a second tier) double your capacity without adding more wall space. They’re especially useful for canned goods or jars.
Check your pantry monthly. Rotate stock (older items toward the front), wipe down shelves to catch spills before they harden, and discard expired items. Pantries accumulate clutter fast, so a quick 15-minute tidying session every month keeps things in check. Use the top shelf sparingly, it’s hard to access and should hold only items you rarely use. Recently, design-forward pantries incorporate creative pantry cabinet organization strategies that blend function and aesthetics, proving that storage doesn’t have to be boring.
If your pantry has an open shelf design, dust more frequently. Open shelves collect dust faster than closed cabinets because they’re exposed to kitchen air currents, cooking steam, and general household dust. A microfiber cloth and a quick weekly wipe-down keep items looking fresh and prevent grime buildup.
Conclusion
Wall pantry cabinets, whether open shelving, tall narrow units, or custom built-ins, transform how kitchens function. Choose a design that matches your space, skill level, and storage needs. Start with solid materials, anchor everything securely to studs, and invest time in thoughtful organization. A well-built pantry keeps your kitchen running smoothly for years to come.